Overview
You can add a custom shift or use a shift template to save time when scheduling.
Adding a shift can be done from a Computer browser for the web app and the mobile app available on iOS and Android devices.
Computer
Create a Shift
Click Scheduler.
- Click to add a shift.
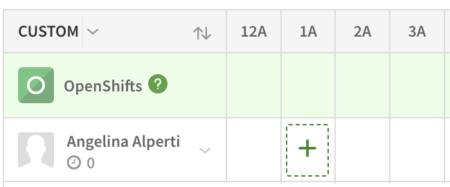
- If you’re on day view, click in the cell that corresponds to the start time and person that you want to schedule.
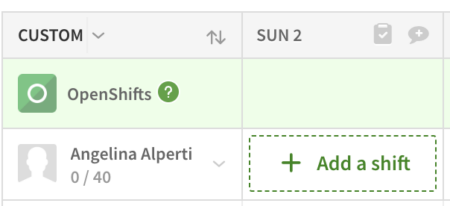
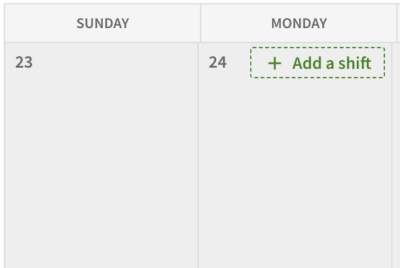
- If you’re on week, two-week, or month view, click [ + Add a shift ] in the date cell.
- If you’re on day view, click in the cell that corresponds to the start time and person that you want to schedule.
- Choose a shift template or create a custom shift:
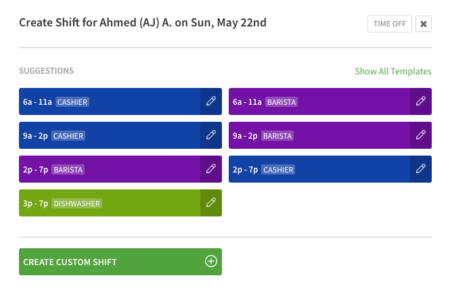 If you want to add a shift you frequently schedule, click one of your shift templates. If you haven’t added shift templates for shifts that regularly occur, create a shift template.
- If you want to use a shift template and customize the shift details, click on the right side of the template.
- If you want to add a one-off shift, click Create Custom Shift.
- Set up or modify the shift details. For more information about modifying shift details, go to shift details.
- Now that you’re done setting up the shift, it’s time to save it and decide whether you want to notify the user immediately.
- If you want to save the shift without publishing and notifying the user, click Save. Employees won’t be able to see the shift or be notified until you publish the shift individually or publish the schedule.
- If you want to publish the shift and notify the user right now, click Save & Publish.
Computer Shift Details
| Name | Assign to |
| Description | (Required) Select who will work the shift. To let any qualified user take this shift, select OpenShift.
|
| Name | Require pick up approval² |
| Description | (Optional) Click to require pick up approval by management. See Require OpenShift Pick Up Approval (Shift Bidding). |
| Name | Share shift with other schedules² |
| Description | (Optional) Offer OpenShifts to qualified users who aren’t assigned to the same schedule as the shift. |
| Name | How many¹ |
| Description | (Optional) Select how many instances of an OpenShift you’d like to publish. |
| Name | Time |
| Description | (Required) Set the the start and end time for the shift. |
| Name | Breaks |
| Description | (Optional) Add a paid or unpaid break in minutes and decide the start time of the break. For example, enter 30 for a half-hour break and 2:30pm for the when they should start this break.
Note: If using Time Clock & Attendance with Automatically Deduct Scheduled Breaks From Timesheets enabled, an unpaid break in the shift details is required for the break to be automatically deducted from timesheets. |
| Name | (Color) |
| Description | (Optional) Select a color for the shift in the top-right corner of the screen. |
| Name | Position |
| Description | (Optional) Select the position that needs to be filled. Assigned positions are listed first in the drop-down list and unassigned positions are grouped together. |
| Name | Job site |
| Description | (Optional) If the shift will take place off site from your normal location, select a job site. |
| Name | Tags |
| Description | (Optional) Select tags if the shift requires additional qualifications or certifications. |
| Name | Shift tasks lists |
| Description | (Optional) Select task lists for the shift. |
| Name | Shift notes |
| Description | (Optional) Add notes (up to 350 characters). **Note: If a shortened URL is used here, it may result in a “<link removed>” message when team members view this via SMS. |
| Name | Repeat shift |
| Description | (Optional) Click to set up a repeating shift. |
| Name | Save as shift template |
| Description | (Optional) Click to create a shift template based on this shift. |
| Name | View who’s currently eligible² |
| Description | (Optional) Click to offer the shift to specific eligible users. |
| Name | Description |
| Assign to | (Required) Select who will work the shift. To let any qualified user take this shift, select OpenShift.
|
| Require pick up approval² | (Optional) Click to require pick up approval by management. See Require OpenShift Pick Up Approval (Shift Bidding). |
| Share shift with other schedules² | (Optional) Offer OpenShifts to qualified users who aren’t assigned to the same schedule as the shift. |
| How many¹ | (Optional) Select how many instances of an OpenShift you’d like to publish. |
| Time | (Required) Set the the start and end time for the shift. |
| Breaks | (Optional) Add a paid or unpaid break in minutes and decide the start time of the break. For example, enter 30 for a half-hour break and 2:30pm for the when they should start this break.
Note: If using Time Clock & Attendance with Automatically Deduct Scheduled Breaks From Timesheets enabled, an unpaid break in the shift details is required for the break to be automatically deducted from timesheets. |
| (Color) | (Optional) Select a color for the shift in the top-right corner of the screen. |
| Position | (Optional) Select the position that needs to be filled. Assigned positions are listed first in the drop-down list and unassigned positions are grouped together. |
| Job site | (Optional) If the shift will take place off site from your normal location, select a job site. |
| Tags | (Optional) Select tags if the shift requires additional qualifications or certifications. |
| Shift tasks lists | (Optional) Select task lists for the shift. |
| Shift notes | (Optional) Add notes (up to 350 characters). **Note: If a shortened URL is used here, it may result in a “<link removed>” message when team members view this via SMS. |
| Repeat shift | (Optional) Click to set up a repeating shift. |
| Save as shift template | (Optional) Click to create a shift template based on this shift. |
| View who’s currently eligible² | (Optional) Click to offer the shift to specific eligible users. |
¹Appears only when you’re scheduling an OpenShift.
²Appears only when you’re scheduling an OpenShift and shift criteria has been defined.
Deleting Shifts Web
Note: Once deleted, shifts can not be recovered and must be manually recreated.
Single Shift
- Hover over the shift you want to delete.
- Click More button, then select Delete.
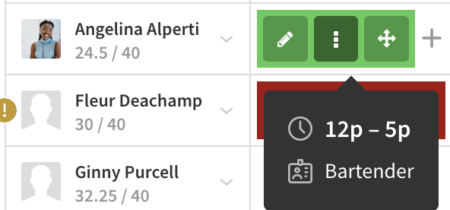 Alternatively, you can edit the shift, then click Delete.
 - (Optional) If you want to let the assigned user know you’re deleting the shift, click Notify <user> and include message on delete and type a message to the user.
This option appears only if the shift hasn’t occurred yet.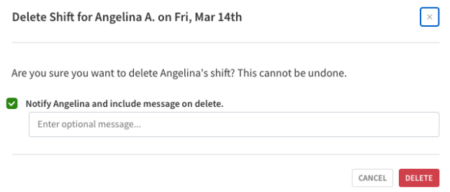
- Click Confirm Delete.
Deleting the entire schedule for a day, week, two-week, or month time frame
To delete the schedule for one of the specified time frames, select the cadence you’d like cleared.
Click the in the top right corner of the Scheduler. From the drop down, click Clear Schedule.![]()
When using the Clear Schedule feature, When I Work will clear any shift that starts in the current view. However, we will not clear shifts that only ends in the current view.
For example, if you are viewing Sunday-Saturday and there was a shift that started last Saturday and overlapped to this Sunday (but you can’t see the start time) we will not clear that shift.
However, if there’s a shift that starts this Saturday and overlaps to the next week on Sunday, it WILL clear that shift because you can see the start of the shift.
Deleting the schedule for a day
You can also clear the schedule for just a specific day by clicking on the date at the top of a column or by switching the Scheduler View to Day.
Then go to the at the top right and select Clear Schedule.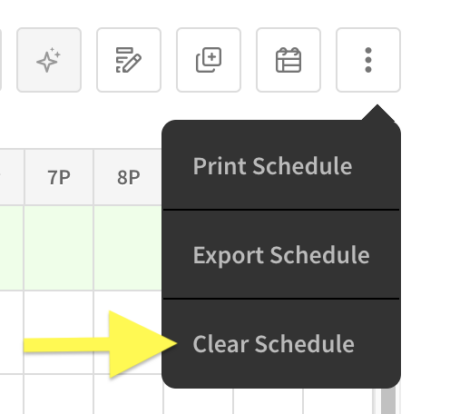
If you clear shifts for the day or week and there’s a shift that overlaps to the next day or week, it won’t remove that shift.
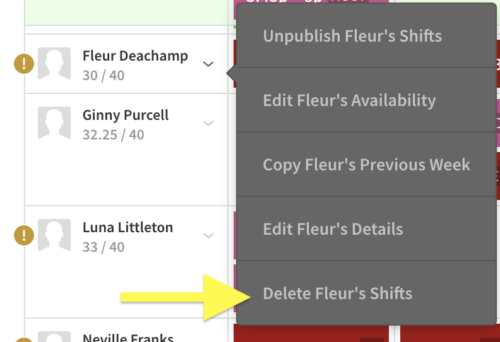
Deleting a user’s shifts for a week
When you delete a user’s shifts for a particular week, his or her shifts for other weeks are not affected.
- From the Scheduler, click Week to select week view.
- Use the arrows on each side of Today or click the to the right of the date(s) to navigate to the week that contains the shifts you want to delete.

- Next to the user’s name, click the downward arrow, then select Delete [name]’s Shifts.
 A confirmation message appears where you can also decide to notify the user of shift deletion.
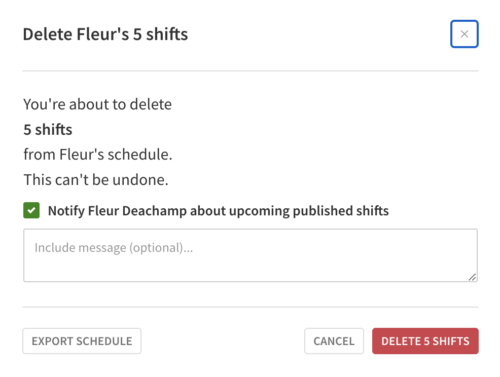
- Click Delete “X” Shifts to confirm you want to delete the user’s shifts.
iOS Device
Create a Shift
- From the When I Work Staff Scheduling app, tap Scheduler at the bottom of the screen.
- Tap in the top-right corner of the screen.
- If you want to add a one-off shift, tap Custom Shift.
- If you want to add a shift you frequently schedule, tap one of your shift templates. If you haven’t added shift templates for shifts that regularly occur, create a shift template.
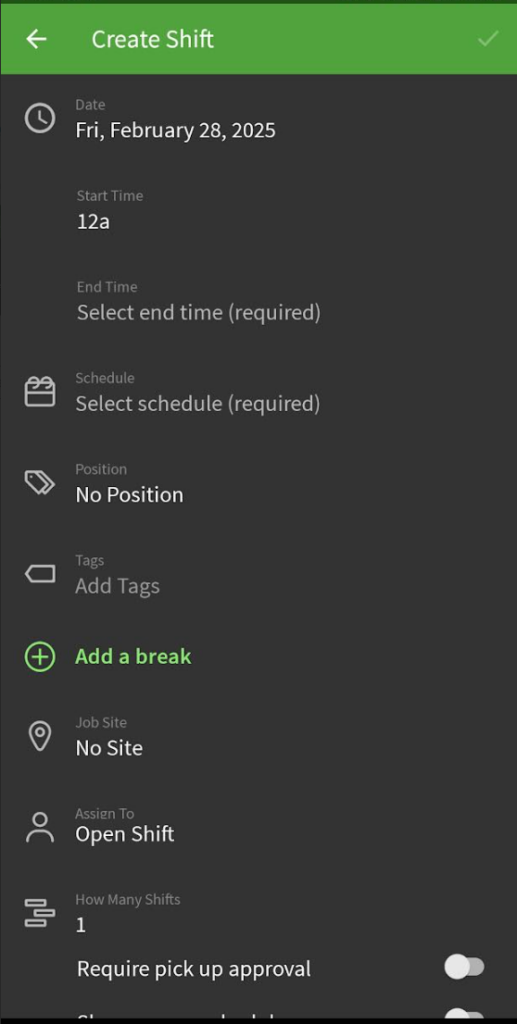
- Set up or modify the shift details. For more information about modifying shift details, go to shift details.
- When you’re finished setting up the shift, then tap Save in the top-right corner of the screen to save the shift.
A confirmation prompt appears.- If you want to save the shift without making it visible to the user, tap Save.
- If you want to make the shift visible and notify the assigned user based on their alert preferences, tap Save & Publish.
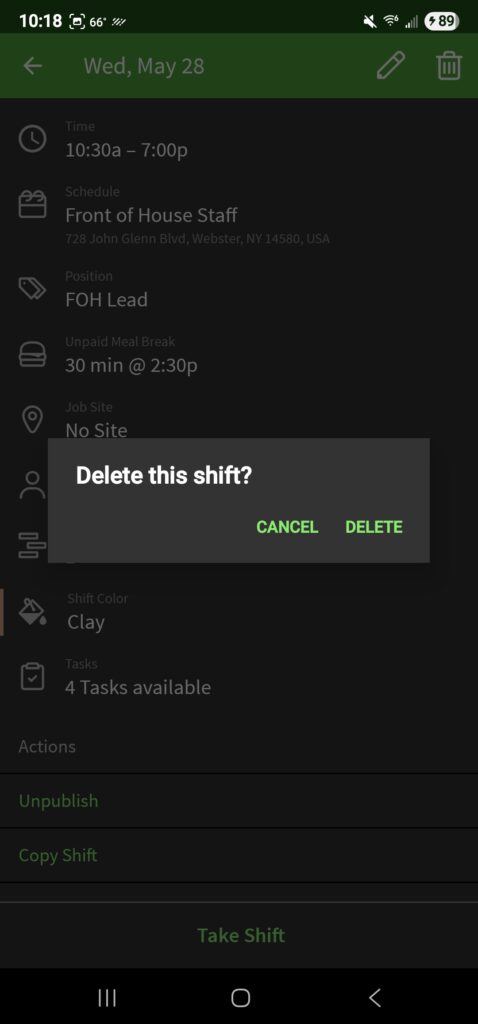
Deleting a Shift iOS
Note: Once deleted, shifts can not be recovered and must be manually recreated.
- From the When I Work Staff Scheduling app, tap Scheduler at the bottom of the screen.
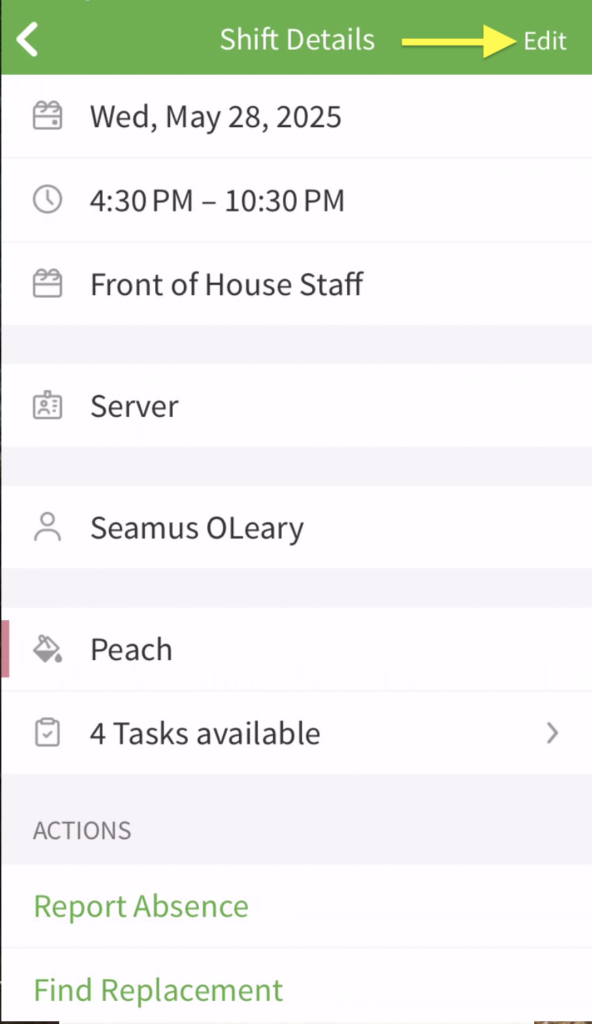
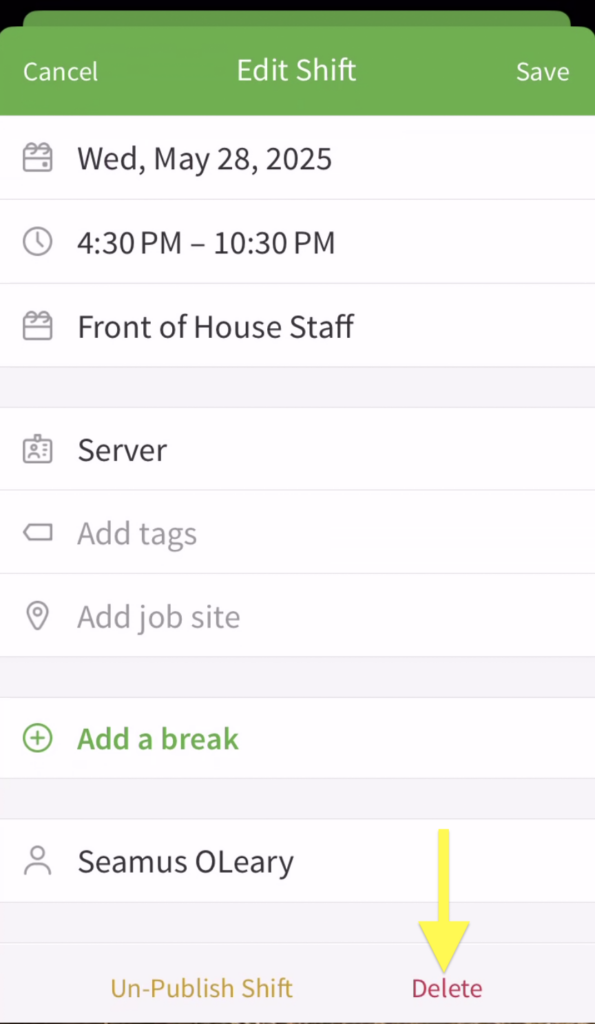
- Tap on the shift you want to delete to open up the Shift Details and then tap on Edit in the top right corner
- Once in the Shift Details card, tap on Delete in the bottom right of the app
- You will get a confirmation message about the deletion of the shift where you can decide to simply delete the shift or delete the shift and notify the team member
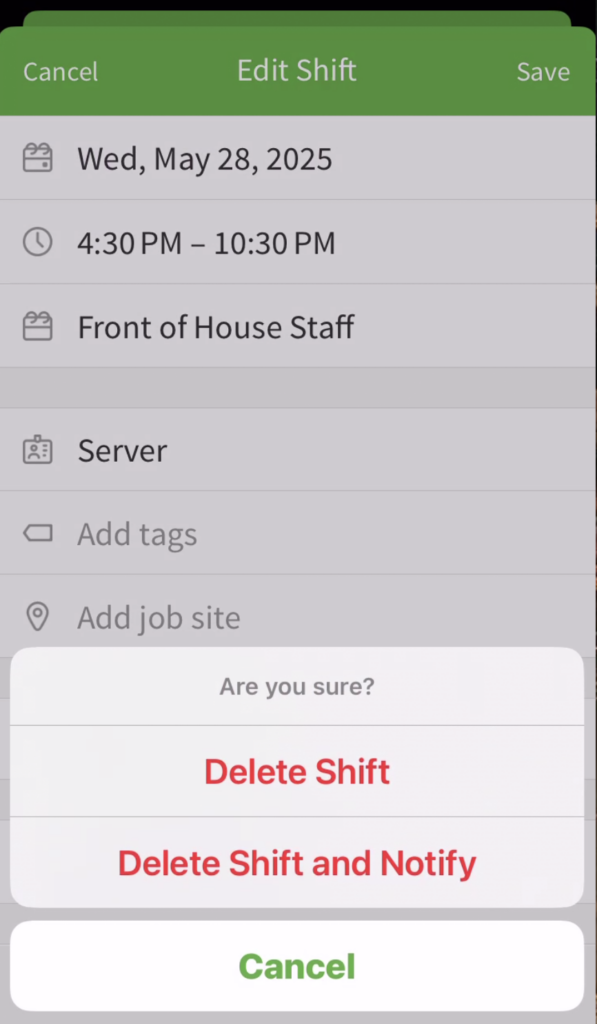
- Choose the option you want and the shift is removed
Android Device
Create a Shift
- From the When I Work Scheduling app, tap Scheduler on the bottom of the screen.
- Tap , in the bottom-right corner.
- If you want to add a one-off shift, tap Custom Shift.
- If you want to add a shift you frequently schedule, tap one of your shift templates. If you haven’t added shift templates for shifts that regularly occur, create a shift template.
- Set up or modify the shift details. For more information about modifying shift details, go to shift details.
- When you’re finished setting up the shift, then tap in the top-right corner of the screen to save the shift.
A confirmation prompt appears.- If you want to save the shift without making it visible to the user, tap Save.
- If you want to make the shift visible and notify the assigned user based on their alert preferences, tap Save & Publish.
Deleting Shifts Android
Note: Once deleted, shifts can not be recovered and must be manually recreated.
Single Shift
- From the When I Work Scheduling app, tap Scheduler on the bottom of the screen.
- Scroll to the shift you want to delete, and tap to open up the details
- Tap the icon in the top right corner
- Confirm by tapping on delete in the pop-up window
- You will see a brief Shift Deleted message appear at the bottom of the screen
Multiple Shifts
- From the When I Work Scheduling app, tap Scheduler on the bottom of the screen.
- In the Scheduler view, long press on any shift to highlight for selection and then tap on the other shifts you want to delete
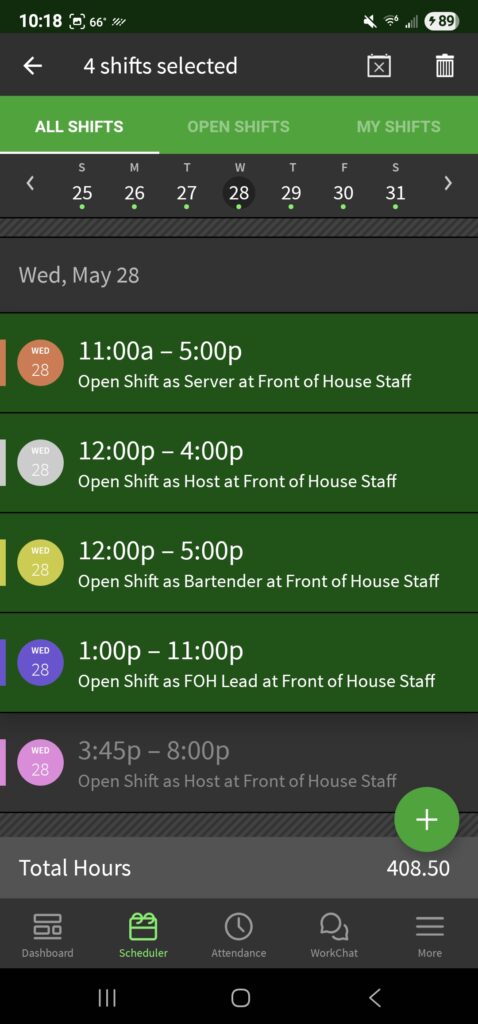
- Once all are selected, tap the in the top right corner
- Tap Yes, Delete on the confirmation window
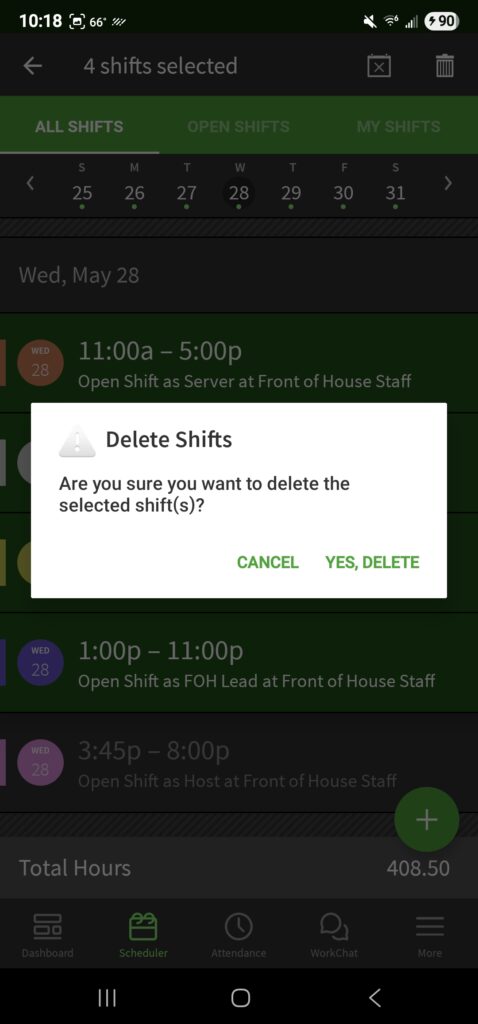
- You will see a brief message displaying Shifts Deleted at the bottom of the app
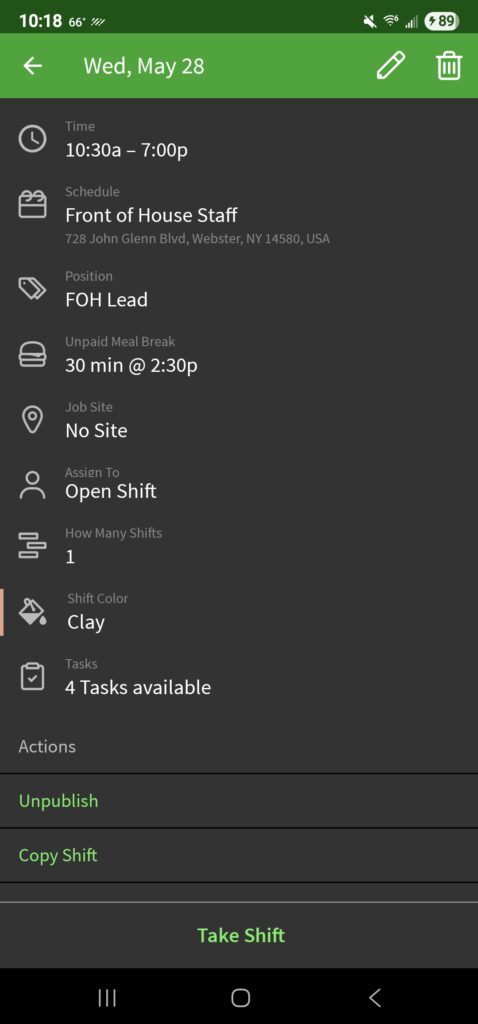
Mobile Shift Details
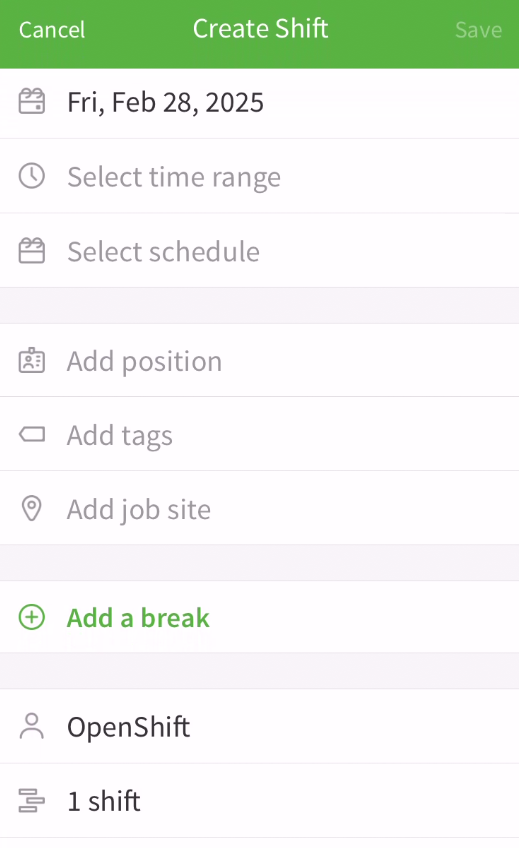
| Date |
| (Required) Set the date for the shift. |
| Time |
| (Required) Set the start and end time for the shift. |
| Schedule |
| (Required) If you have multiple schedules, select the schedule where the shift should be added. |
| Position |
| (Optional) Select the position that needs to be filled. |
| Tags |
| (Optional) Select tags if the shift requires additional qualifications or certifications. |
| Breaks |
| (Optional) Add a paid or unpaid break (also called lunch break) by tapping on [ + Add a break ]. Fill in the details and tap on Android or Done on iOS to save break details and continue editing other shift details.
Note: If using Time Clock & Attendance with Automatically Deduct Scheduled Breaks From Timesheets enabled, an unpaid break in the shift details is required for the break to be automatically deducted from timesheets. |
| Job site |
| (Optional) If the shift will take place off site from your normal location, select a job site. |
| Assign to |
(Required) Select who will work the shift.
|
| How many shifts² |
| (Optional) Select how many instances of an OpenShift you’d like to publish. |
| Requires pick up approval² |
| (Optional) Tap the switch to require pick up approval by management. See Require OpenShift Pick Up Approval (Shift Bidding). |
| Share with other schedules² |
| (Optional) Offer OpenShifts to qualified users who aren’t assigned to the same schedule as the shift. |
| Eligible employees¹ |
| (Optional) Tap to offer the shift to specific eligible users. |
| Shift color |
| (Optional) Select a color for the shift. |
| Shift task lists |
| (Optional) Select task lists for the shift. |
| Notes |
| (Optional) Add notes (up to 350 characters). **Note: If a shortened URL is used here, it may result in a “<link removed>” message when team members view this via SMS. |
| Name | Description |
| Date | (Required) Set the date for the shift. |
| Time | (Required) Set the start and end time for the shift. |
| Schedule | (Required) If you have multiple schedules, select the schedule where the shift should be added. |
| Position | (Optional) Select the position that needs to be filled. |
| Tags | (Optional) Select tags if the shift requires additional qualifications or certifications. |
| Breaks | (Optional) Add a paid or unpaid break (also called lunch break) by tapping on [ + Add a break ]. Fill in the details and tap on Android or Done on iOS to save break details and continue editing other shift details.
Note: If using Time Clock & Attendance with Automatically Deduct Scheduled Breaks From Timesheets enabled, an unpaid break in the shift details is required for the break to be automatically deducted from timesheets. |
| Job site | (Optional) If the shift will take place off site from your normal location, select a job site. |
| Assign to | (Required) Select who will work the shift.
|
| How many shifts² | (Optional) Select how many instances of an OpenShift you’d like to publish. |
| Requires pick up approval² | (Optional) Tap the switch to require pick up approval by management. See Require OpenShift Pick Up Approval (Shift Bidding). |
| Share with other schedules² | (Optional) Offer OpenShifts to qualified users who aren’t assigned to the same schedule as the shift. |
| Eligible employees¹ | (Optional) Tap to offer the shift to specific eligible users. |
| Shift color | (Optional) Select a color for the shift. |
| Shift task lists | (Optional) Select task lists for the shift. |
| Notes | (Optional) Add notes (up to 350 characters). **Note: If a shortened URL is used here, it may result in a “<link removed>” message when team members view this via SMS. |
¹Appears only when you’re scheduling an OpenShift and shift criteria has been defined.
²Appears only when you’re scheduling an OpenShift.